GitHub
Well known online Repository, commonly used for open source projects. Which has Source code view, Web editing (even TFS does not support this), Wiki and defect tracking system. There are couple of most commonly used flow for production roll out.Git Commands
These are some of commands commonly used in GitHub. Most commands are integrated with Visual Code itself.- Fork
- Origin
- Checkout
- Fetch
- Pull
- Push
- Merge
- MergeTool
- PullRequest
Fork, is to create a personal branch
Command: git fork https://github.com/<<orgnization>>/<<project>>.git
GitHub UI: Click on Fork button on a repository, which will prompt “Where should we fork this repository” with profile and repository. Click username or profile to create personal branch. If there is fork available for the profile it will display personal branch and the repository branch.
Set Origin, is to set working directory for development
Command: git remote add origin https://github.com/<<organization>>/<<project>>.git
Pull, to get latest version from a branch
Command: git checkout –q
-q is to keep quite on
checkout git fetch
git pull
Push, to push changes to remote from local
Command: git commit –all –m
--all – is used to take all the changes or developer can specify a file name
-m is the description for the commit change
– f is to set commit description on a file git push
Merge, if there is no conflict on check-in git merge will be able to merge all changes between branches. If there is any conflict, we have to fix those conflict and push it again. Git Hub doesn’t have any UI merging tool to fix a conflict, GitHub appends the conflict with arrow notation which highlights what came-in and what was checked-in. From this developer can fix them manually. There are lots of merge tools available in market like kdiff3, IntelliJ IDEA and lot more.
Visual Studio can also be used a merge tool. Unfortunately Visual Studio Code does not support merging.
We can use Visual Studio 2015 to do merging in UI. Once conflicts are resolved locally, perform push command to push the changes to remote, which helps merge fork/branch to desired branch.
How to set Visual Studio 2015 as merge tool?
- Open VS 2015, install GitHub Extension
- Open Team Explore, Click on Settings
- Click on Global Settings to define
- User Name
- Email Address
- Merge Tool
[user]
name = xxx
email = xxxx@xxx.xxx
[merge]
tool = vsdiffmerge
[mergetool]
prompt = true
[mergetool "vsdiffmerge"]
cmd = \"C:\\Program Files (x86)\\Microsoft Visual Studio 14.0\\Common7\\IDE\\vsdiffmerge.exe\" \"$REMOTE\" \"$LOCAL\" \"$BASE\" \"$MERGED\" //m trustexitcode = true
[mergetool "vsdiffmerge"]
keepbackup = false
[diff]
tool = vsdiffmerge
[difftool]
prompt = true
[difftool "vsdiffmerge"]
cmd = \"C:\\Program Files (x86)\\Microsoft Visual Studio 14.0\\Common7\\IDE\\vsdiffmerge.exe\" \"$LOCAL\" \"$REMOTE\" //t
[difftool "vsdiffmerge"]
keepbackup = false
User name and email are defined which can be used as a default attributes for git commit and git push
Setting up Development Environment using Visual Studio Code
- Visual Studio Code by default supports GitHub integration
- Fork a branch
- Create a folder in local path, open the folder in Visual Studio Code and Initialize GitHub
- Execute git origin to set working directory (Use personal branch instead of remote branch)
- Reopen Visual Studio Code by default VS Code will be opened with master branch in VS Code which will be displayed on Task bar.
- Click “master” Git Icon from task bar, which helps to checkout a branch to local folder.
- Click “sync” on git repository to get latest version from remote.
Check-in changes
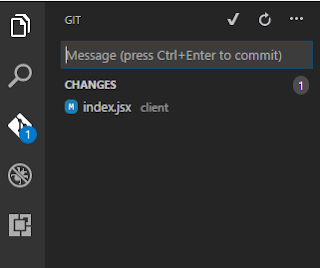
- After making necessary changes click on Git which show changes performed.
- Click on Tick mark which help commit changes with label for the changes
- Click on “sync” icon or push link from "..." icon to push and pull changes to remote.
How to merge conflicts on pull request
- Open folder from which check-in is performed.
- Open command prompt (Please do not use Visual Studio Code for executing this as merge tool. Launch is not supported from VS Code)
- Pull repository files from where conflict is happening, for e.g.,
- git pull https://github.com/<<organization>>/<<project>>.git <<branch>>
- On completion of pull request, conflicts will be available in working folder.
- Execute merge, “git mergetool” which will launch for Visual Studio 2015 to resolve conflict.
- Execute push, “git push” which will push the changes to remote.
This will help to fix merge conflict on a pull request from personal branch or a branch to desired branch.


